Services
A Kubernetes Service object enables communications with components within, and outside of, the application. You can think of Services like doors; sure there are other ways to get into the house (e.g. windows, trap doors, the cimney), but the front door is your best bet! In the diagram below, take note of the fact that Services really are the gatekeepers of communication. We see users outside of the node accessing a Pod; we see Pods talking to eachother; and we see a Pod reach outside of the Node to an external database.

There are three kinds of Service objects:
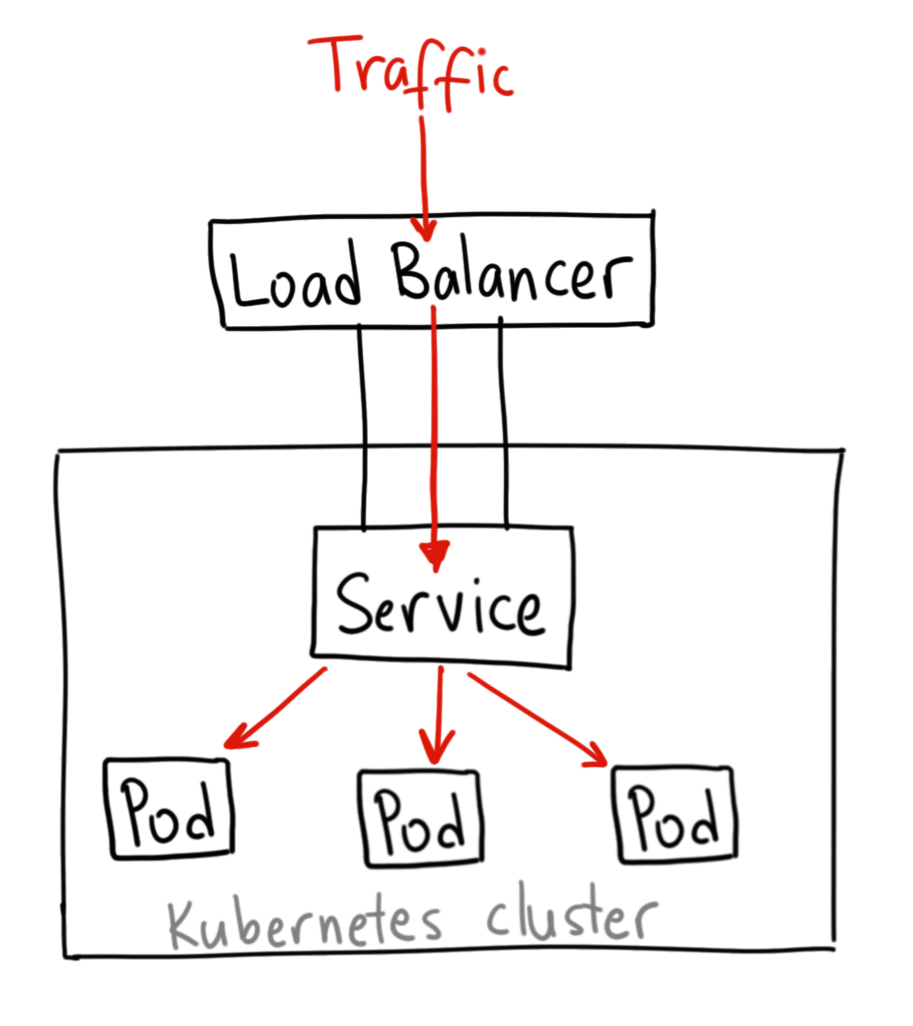
- LoadBalancer: Exposes Pods externally using a cloud provider’s load balancer.
- ClusterIP: Service creates virtual IP within cluster to enable communication between different services.
- NodePort: Service makes an internal port accessible through a port on the Node.
We will elaborate on the three Service types, and create a respective object for the following Pod config:
LoadBalancer Service
To reiterate, a LoadBalancer Service exposes Pods externally using a cloud provider’s load balancer.

A LoadBalancer Service object will give you a single IP address that will forward all traffic to your service, exposing it to the BBI (Big Bad Internet). Your particular implementation of the LoadBalancer may vary depending on which cloud provider you use, so I’ll link you to the Kubernetes Documentation for more info.
ClusterIP Service
To reiterate, a ClusterIP Service object creates a virtual IP within the cluster to enable communication between different services.

In the diagram above, we are routing front-end to back-end, and back-end
to redis; all enabled with the use of services. Let’s create a ClusterIP
Service object that routes front-end to back-end.
| |
- Tell K8s that you want to make a ClusterIP Service object.
- Tell the ClusterIP Service what ports it should care about;
portspecifies the port that the Service is listening on, and thetargetPortspecifies the port that the target Pod is listening on. - Using a selector with the labels of the Pod definition from above, we
tell the NodePort to target
myapp-pod. This will select all Pods matching this selector, and randomly route traffic to one of them. Of course, to learn how to change this random behavior, see here.
NodePort Service
To reiterate, a NodePort Service object makes an internal port accessible through a port on the Node.

In the diagram above, take notice of:
targetPort: field that refers to the Port of the Pod you wish to target.port: field that refers to the port on the service itself. The Service acts a lot like a virtual server, having it’s own IP address for routing, which is the cluster IP of the service.nodePort: which is the port being exposed from the Node. The default port range is 30000 - 32767, but this can be assigned to any ephemeral port.
Let’s create a NodePort Service definition file for myapp-pod, referenced
in the Services section.
| |
- Tell K8s that you want to make a NodePort Service object.
- Tell the NodePort what ports it should care about.
- Using a selector with the labels of the Pod definition from above, we
tell the NodePort to target
myapp-pod.
Now, from the command line:
| |
If there are multiple Pods that match the selector, Kubernetes will select one at random to route the traffic to. This behavior can be changed, as described here.
Ingress Controllers
Let’s say you own a website that has several applications accessible through
different paths. For example, google.com/voice, google.com/hangouts, etc…
Normally, your browser would perform a DNS lookup for google.com, and route
all traffic to whatever IP resolves. You would need to utilize a NodePort to
expose a port, and then a series of LoadBalancers to route traffic to Pods in
a scalable fashion. If you are on GCP, Azure, or AWS, you must pay for each
LoadBalancer, not to mention the fact that you have to implement SSL/TLS
through each hop, configure firewall rules for each service, etc…
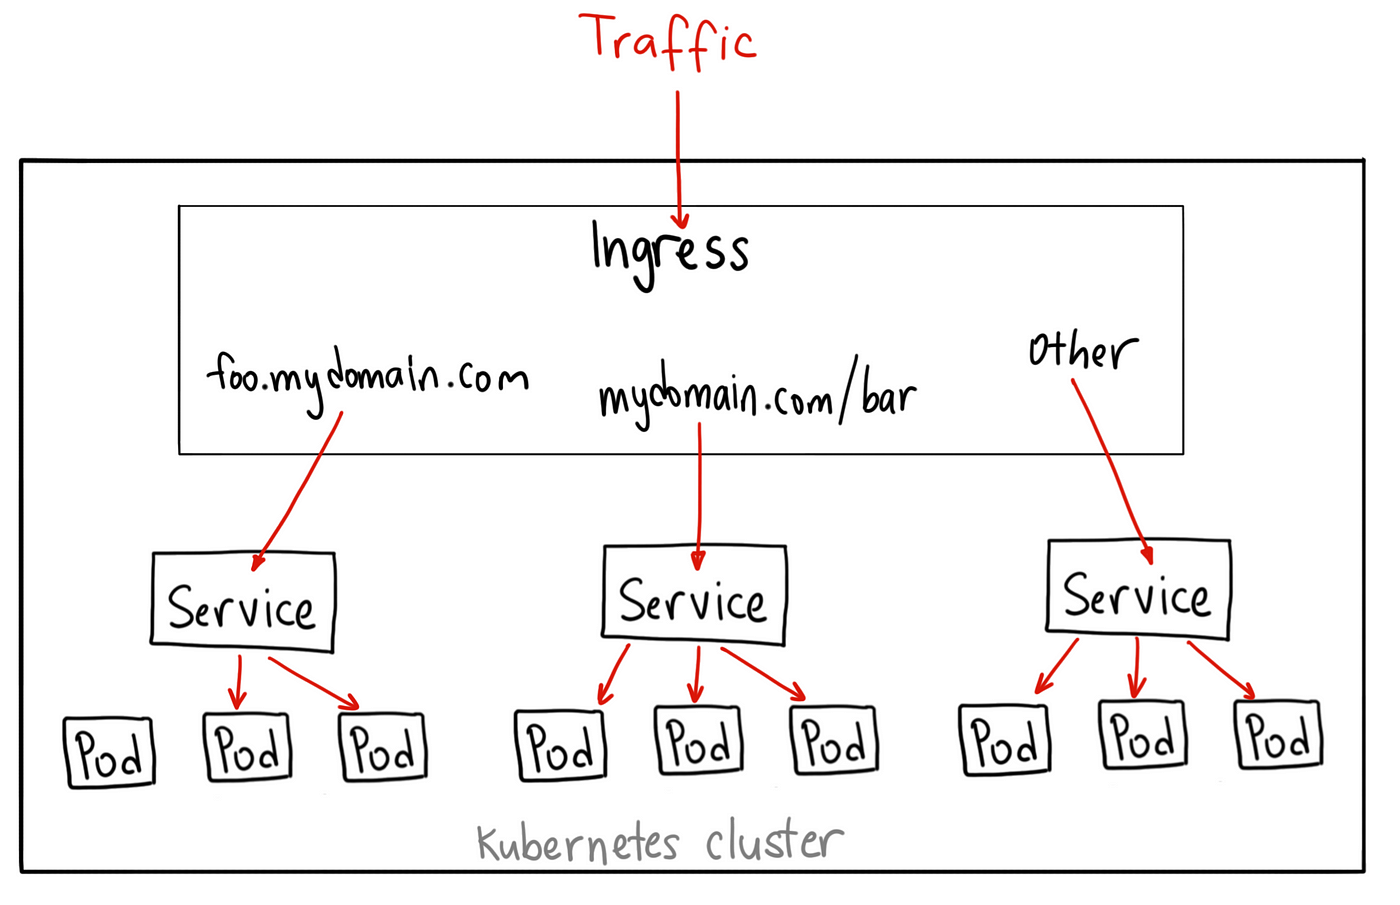
This is becoming a headache, but thankfully, you can manage all of this directly from the Kubernetes cluster with the use of an Ingress. Ingress helps your users access your application through a single externally- accesible URL that you can configure to route to different services within your cluster. Oh, and you can configure it to use SSL!

To begin setting up an Ingress, we must deploy an Ingress Controller, which is the application responsible for handling the proxying for us. You can use Nginx, Contour, HAProxy, Traefik, Istio, or some other application, but we will be using Nginx in this example. To configure an Ingress Controller, we require: a Deployment that abstracts interacting with the Nginx Pod, a NodePort Service to expose the Ingress Controller to the outside world, and a ServiceAccount to provide the Ingress Controller the ability to modify the internal K8s network. Let’s start by creating the deployment:
| |
We create some environment variables that will be visable to all containers in our Pod. We utilize the metadata from the Pods that will be created and assign them to
POD_NAMEandPOD_NAMESPACE.We run
/nginx-ingress-controller --configmap-$POD_NAMESPACE)/nginx-configurationon the Pod to run the nginx server, using the environment variables we defined in the lines above. We definenginx-configurationin a second, but this is essentially a file that stores configuration information about the Ingress Controller.We specify the ports used by the Ingress Controller, which are your classic HTTP/S ports.
Now, we need to create a ConfigMap to pass information about how to configure the Nginx server. We won’t add much to it, but just know that if you ever need to configure your Ingress Controller, this is the place to do it:
Next, we need to create a NodePort Service object to route traffic that hits the node through TCP ports 443 or 80 to all Pods that match the given selector.
Finally, we need to create a ServiceAccount with the correct roles and role bindings. This will allow the Ingress Controller to monitor the Kubernetes cluster for Ingress Resources (which we will describe in the next section.
Ingress Resources
Now, it’s time to define Ingress Resource objects, which are sets of rules and configurations that are applied to the Ingress Controller. Through the use of Ingrss Resources, we can: forward all incoming traffic to a single application, route traffic to different applications based on the URL, route users based on the domain name itself, etc… Let’s start by defining an Ingress Resource to serve the Google Voice application.
And now, we’ll create another Ingress object to describe the path to our Google Hangouts application.
Now that we’ve defined Ingress Resources for our Google Voice and Google Hangouts apps, we need to tell the IngressController how to manage routing. Let’s build an Ingress Resource that routes traffic based on the URL; e.g. google.com/voice, google.com/hangsouts, etc. :
| |
At this point we can hit the specified backend via their specified
serviceName and servicePort. But let’s say that instead, we wanted to be
able to route traffic based on the domain. For example, we want to launch our
Voice app through voice.google.com. Well, the good news is, we can simply
add another Ingress Resource taht has rules defined for host:
| |
Tada! It’s that easy! If you go in your browser address bar right now and type
https://google.com/voice, then you’ll notice that you are redirected to
https://voice.google.com. This is accomplished with the use of the
rewrite-target option. For more information, see
here.
Network Policies
A NetworkPolicy is a way to control inbound or outbound traffic that Pods can receive or send. A NetworkPolicy is another Kubernetes object that uses labels and selectors to determine what Pods to target.
Let’s say we have an API that sends logfiles to a database. Refer to the Pod specs below:
As you can see, we the two Pods we are concerned about are named api-pod and
log-db. Let’s create a SecurityPolicy object to only allow ingress (inbound)
traffic to log-db from api-pod over port 3306/TCP.
| |
- Utilize selectors to select Pods with
role=db. - Specify that you want to define an ingress policy.
- Describe your ingress policy. You want to allow
ingresstrafficfromall Pods that match thepodSelector:name=api-podoverport=3306with protocolTCP.
Defining an egress (outbound) traffic rule is pretty much the same. The K8s docs describe this ad nauseum.
NOTE: Not all network solutions support NetworkPolicies. Kube-router, Calico, Romana, and Weave-net, are a few network solutions that support K8s NetworkPolicy objects. Read the K8s docs for more info.